How to Build a Lean-To Greenhouse
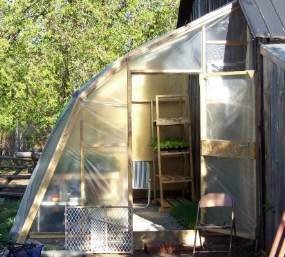 You can build a lean-to greenhouse like mine quicker and cheaper than you might think.
When we launched our CSA Market Garden in 2006 we decided to build a lean-to greenhouse
to keep our transplants growing until we planted them out.
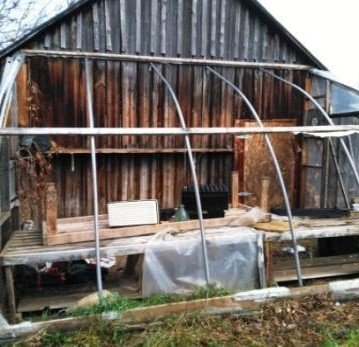
The picture above is the 10' x 16' result of that decision. But you don't have to be a market gardener to benefit from your own lean-to greenhouse.
We live in uncertain time. The desire for self-sufficiency and a more sustainable lifestyle is driving many to get serious about securing their food supply.
A lean-to greenhouse could be the answer to your quest for food security and a step towards a more self-reliant life.
Why Build a Lean-To Greenhouse?
Lean-to greenhouses are cost-effective, space-efficient, and relatively simple to construct. By attaching it to an existing structure, such as your home or a shed, you save on building materials and heating costs.
A cheap greenhouse gives you season extension and crop protection for very few dollars. In my book Bootstrap Greenhouse I write about the 2017 season of ‘weird weather’ in my part of the world. Record rainfall took a toll on farmers of all sorts.
Even when it wasn't actually pouring rain, the ground remained soggy and too wet to put equipment in the field. This delayed crops all across the region. Feed and hay became scarce later in the season as well.
Then, the spring of 2018 was unseasonably cold.
What saved our market garden business were our greenhouses. We were able to salvage the season because of our protected growing space.
We had the space to start crops and keep transplants for an extended period, until we could work the fields.
All my greenhouses have more than paid me back for the time and money I spent in constructing them, in just the first growing season alone. This was especially true for the lean-to, it has produced thousands of dollars worth of transplants.
In the picture at top, my lean-to is attached to the south-facing wall of one of my outbuildings. It was built with steel hoops I bartered from a neighbour.
My cash outlay for the framing lumber, screws and bolts, and 5-year UV-treated greenhouse plastic brought the cost per square foot to about $1.00.
With inflation, that might be $1.50 these days. But still the cheapest useful covered space you can build. If you are good at scrounging you might even hit that $1.00 mark.
Build a Lean-To Greenhouse Step-by-Step
Here's the short list of design and build considerations.
Zoning Issues. In my county plastic-covered greenhouses are considered temporary structures and don't require a permit. Best to confirm your situation with your local bylaw enforcement folks before you start.
Planning and Design. Every successful project starts with a plan, and your lean-to greenhouse is no exception. My lean-to greenhouse is the first one we ever built.
This simple structure is built from greenhouse hoops, (actually half-hoops), with dimensional lumber for framing the base and the end walls.
Despite the simplicity of construction, and the flexibility of building with steel hoops and plastic, we still spent some time on site and design considerations.
It must have worked out OK; 17 years later our lean-to is still standing. I've replaced the plastic a couple times, but the structure is still sound.
You will need to adapt your design to your site and the materials you have access to, but here are the basics.
Orientation. Basically any south-facing wall of adequate height and width can accommodate your lean to greenhouse. South-facing is ideal, as it ensures your plants receive the maximum amount of sunlight throughout the day.
It’s not a problem if your location is a few degrees off south. My lean-to is oriented west of due south by about 15 degrees, and it works fine.
Site considerations. Avoid any obstructions to the south e.g. large trees, other buildings. The quality of soil is not a concern You can use benches, or even build deep beds for growing directly in the dirt.
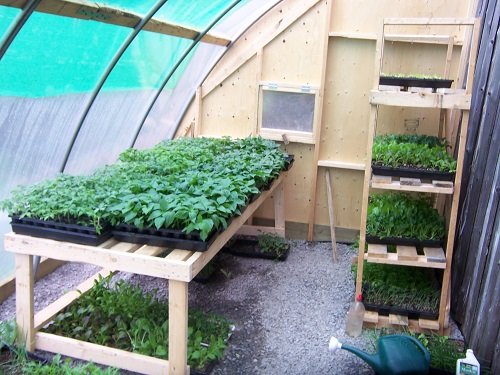 My lean-to with benches and shelves for transplants.
Air circulation. In the picture above you can see a window framed in the west end wall. The entry door and ventilating exhaust fan are in the east end wall, allowing for a good cross-circulation of air.
Your lean-to will heat up quickly and cook your plants without adequate air circulation. In the picture you can also see the shade cloth we apply in really hot weather.
Lean-To Greenhouse Construction Details
For us, determining the ultimate height and width of the lean-involved a series of adjustments.
To get an idea of the dimensions we needed for the base frame and end walls, we placed a hoop up against the wall. We tinkered around with the slope of the hoop a bit until it looked like a good fit.
Since we had bartered for these hoops, and had never actually seen them in a structure, we were guesstimating as to the correct dimensions and placement.
Fortunately, this type of construction is very flexible and adaptable to site conditions. The key thing here is to adjust your dimensions to suit your material and location.
A 16-foot width fit comfortably on the south-facing
wall at a good height. A 20-foot width would have been crowding things a bit on this gable end of the building.
This brought the ground end of the hoops out to 10 feet from the building, so our base frame, built of 2x6 spruce, was 16' x10'.
 Lean-to dimensions 11'h x 16'l x 10'w
In the picture above you can see a ledger beam attached to the building at our desired height of 11 feet. We leveled the beam, and attached the hoops using steel strapping.
We use steel strapping to secure the hoops to the base frame as well.
We framed in the end walls using 2x4 spruce. We sheathed the west end wall in 3/8 plywood. This wall held a 2-foot-square window we could open for cross-ventilation.
The east end wall, including the door, was covered in greenhouse plastic to allow for more light.
Finding Hoops and Other Lean-To Parts
If you are not lucky enough to have a friend with a handy pile of hoops, you will need to do some scrounging.
A quick Duck-Duck-Go search for ‘used greenhouses’ returned the following:
- Used Greenhouses - BC Greenhouse Builders
- New and used Greenhouses for sale | Facebook Marketplace
- Greenhouses - For Sale - Grow Trader
- Greenhouse for sale second hand - Grays
- Used Greenhouse For Sale - Garden Items For Sale - Shoppok
- Greenhouses & Cold Frames for Sale - eBay
- Greenhouse Grower Classifieds
- Saskatchewan Grower to Grower New & Used Greenhouse
- Farm Equipment
If you are looking for a parts kit to build your own greenhouse using lumber and hoops sourced locally, read my review of the Bootstrap Farmer DIY Hoop House Kit. They offer a great selection and good prices. You can buy hoop house parts, kits, or a complete hoop house including plastic.
A Step Towards Self-Sufficiency
Building my lean-to greenhouse gave me more than just a place to cultivate plants, it was an important step in cultivating a future of self-sufficiency, sustainability, and resilience.
It's crazy times, you can begin to take control of your food security with a DIY lean-to greenhouse. Use the resources listed above, and if you want a little more guidance check out my Bootstrap Greenhouse book. Includes construction details for the three styles of greenhouse I built on New Terra Farm (including my lean-to).
Other links of interest
Here's my curated list of micro-farm equipment for the small grower
Check out some great products for farmers and gardeners here farm grown reviews
This is a pretty good article about Urban Survival.
You might also want to up your survival game with my Homestead Book Bundle
And, because there is more to survival than just food, here's a resource with literally HUNDREDS of great tips and low-cost projects for your homestead. The Self Sufficient Backyard. Highly recommended.
- Home
- Build a Greenhouse
- Build a Lean-To Greenhouse
See Something You Like? Share!
Got questions to ask, stories to tell?
Share your organic market gardening question, or comment, or story.
I'm an affiliate for some products I promote on this site. This means I get a small commission for a product you buy through a link on one of my pages. This doesn't cost the buyer anything, but provides me an additional income to help support these pages.

